Showing posts with label Linux. Show all posts

Friday 18 July 2014

How to add User nagios


How to add user nagios.

Untuk menambahkan user pada nagios adalah dengan command sebagai berikut

htpasswd /usr/local/nagios/etc/htpasswd.users namauser
 
Kemudian setelah itu muncul masukan password


Contoh 
 
htpasswd -c /usr/local/nagios/etc/htpasswd.users budi
 
masukan password
 
 
Untuk cara melihat user yang ada di nagios
 
 
Vi /usr/local/nagios/etc/htpasswd.users 
 
 
nanti disitu ada beberapa user dengan password di enkrip.


next kita buat tutorial privilage user nagios.


Thursday 13 September 2012

ACL (Access Control List)

ACL adalah Access Control List dimana command linux ini adalah untuk permission suatu file atau directory yang hanya boleh di akses oleh user tertentu (folder juga termasuk).


Thursday 21 June 2012

Install Nagios di Ubuntu 10.04


Nagios (play /ˈnɑːɡs/) is a popular open source computer system monitornetwork monitoring and infrastructure monitoringsoftware application. Nagios offers complete monitoring and alerting for servers, switches, applications, and services and is considered[by whom?] the defacto industry standard in IT infrastructure monitoring. It watches hosts and services, alerting users when things go wrong and again when they get better.
Nagios, originally created under the name NetSaint, was written and is currently maintained by Ethan Galstad, along with a group ofdevelopers actively maintaining both official and unofficial plugins. N.A.G.I.O.S. is a recursive acronym: "Nagios Ain't Gonna Insist On Sainthood",[3] "Sainthood" being a reference to the original name NetSaint, which was changed in response to a legal challenge by owners of a similar trademark.[4] "Agios" is also a transliteration of the Greek word άγιος which means "saint".
Nagios was originally designed to run under Linux, but also runs well on other Unix variants. It is free software, licensed under the terms of the GNU General Public License version 2 as published by the Free Software Foundation.
In a 2006 survey among the nmap-hackers mailing list, 3243 people responded when asked for their favorite network security tools. Nagios came in 67th overall and 5th among traffic monitoring tools. Nmap itself was excluded from the list. Update: The 2011 list has been released and Nagios is listed at #69. [5]
Nagios XI is the new front end that was recently released. It is built on top of the free Nagios Core, and by far the most spohisticated front end available for Nagios Core. It is licensed at a modest price, which includes up to 10 Nagios support calls.
Nagios is Open Source Software licensed under the GNU GPL V2.
  • Monitoring of network services (SMTPPOP3HTTPNNTPICMPSNMPFTPSSH)
  • Monitoring of host resources (processor load, disk usage, system logs) on a majority of network operating systems, including Microsoft Windows with the NSClient++ plugin or Check_MK.
  • Monitoring of anything else like probes (temperature, alarms...) which have the ability to send collected data via a network to specifically written plugins
  • Monitoring via remotely-run scripts via Nagios Remote Plugin Executor
  • Remote monitoring supported through SSH or SSL encrypted tunnels.
  • Simple plugin design that allows users to easily develop their own service checks depending on needs, by using the tools of choice (shell scriptsC++PerlRubyPython,PHPC#, etc.)
  • Plugins available for graphing of data (NagiosgraphPNP4NagiosSplunk for Nagios, and others available)
  • Parallelized service checks available
  • Ability to define network host hierarchy using "parent" hosts, allowing detection of and distinction between hosts that are down and those that are unreachable
  • Contact notifications when service or host problems occur and get resolved (via e-mailpagerSMS, or any user-defined method through plugin system)
  • Ability to define event handlers to be run during service or host events for proactive problem resolution
  • Automatic log file rotation
  • Support for implementing redundant monitoring hosts
  • Optional web-interface for viewing current network status, notifications, problem history, log files, etc.
  • Data storage is done in text files rather than database.
  • Nagios Agents

    [edit]
    NRPE

    Nagios Remote Plugin Executor (NRPE) is a Nagios agent that allows remote systems monitoring using scripts that are hosted on the remote systems. It allows for monitoring resources such as disk usage, system load or number of users currently logged in. Nagios periodically polls the agent on the remote system using the check_nrpe plugin.

    [edit]
    NRDP

    Nagios Remote Data Processor (NDRP) is a Nagios agent with a flexible data transport mechanism and processor. It is designed with an architecture that allows it to be easily extended and customized. NRDP uses standard ports and protocols (HTTP(S) and XML) and can be implemented as a replacement for NSCA.

    [edit]
    NSClient++

    This program is mainly used to monitor Windows machines. Being installed on a remote system NSClient++ listens to port TCP 1248. Nagios plugin that is used to collect information from this addon is called check_nt. As NRPE, NSClient++ allows to monitor the so called "private services" (memory usage, CPU load, disk usage, running processes, etc.)

    INSTALL NAGIOS


    Now We Will Disable AppArmor

     
    /etc/init.d/apparmor stop
    update-rc.d -f apparmor remove
    aptitude remove apparmor apparmor-utils

    Create Folder For Nagios And Nagios Plugins

    mkdir /downloads

    Now Let's Install The Required Programs For Nagios

    Make sure you select Smarthost option when installing Postfix:
    aptitude -y install apache2 libapache2-mod-php5 build-essential libgd2-xpm-dev postfix
    Now let's update everything on this system:
    aptitude update
    aptitude safe-upgrade

    Nagios User Setup

    useradd -m -s /bin/bash nagios
    passwd nagios
    usermod -G nagios nagios
    groupadd nagcmd
    usermod -a -G nagcmd nagios

    Download And Unzip Nagios And Nagios Plugins

    cd /downloads
    wget http://prdownloads.sourceforge.net/nagios/nagios-3.2.3.tar.gz
    wget http://prdownloads.sourceforge.net/nagiosplug/nagios-plugins-1.4.15.tar.gz
    tar -zxf /downloads/nagios-3.2.3.tar.gz
    tar -zxf /downloads/nagios-plugins-1.4.15.tar.gz

    Install Nagios

    cd /downloads/nagios-3.2.3
    ./configure --with-command-group=nagcmd
    make all
    make install
    make install-init
    make install-config
    make install-commandmode
    make install-webconf

    Nagios Password

    This is the password you will need to look at the nagios pages. If you install Nagios to a different directory please change this command to where the Nagios etc. folder will be.
    htpasswd -c /usr/local/nagios/etc/htpasswd.users nagiosadmin
    Enter your password when prompted.
    Now we will restart Apache to make sure all of the changes take effect:
    /etc/init.d/apache2 restart

    Install Nagios Plugins

    cd /downloads/nagios-plugins-1.4.15/
    make
    make install
    Now we need to make Nagios start at bootup:
    ln -s /etc/init.d/nagios /etc/rcS.d/S99nagios

    Change Default Email Address For Nagios Admin

    Open your favorite editor and open /usr/local/nagios/etc/objects/contacts.cfg and change this:
    nagios@localhost
    To this:
    You@yourdomain.com
    Once you have saved your changes to the contacts.cfg we need to verify that there are no errors in the configuration of Nagios.
    /usr/local/nagios/bin/nagios -v /usr/local/nagios/etc/nagios.cfg
    Here is what you should see. It is okay to have a couple of warnings, but you can't have any errors.
    Now we are going to start nagios:
    /etc/init.d/nagios start

    Postfix Configuration For A Smarthost Relay

    postconf -e 'relayhost=yourmailserver.com'
    postconf -e 'smtp_sasl_auth_enabled = yes'
    postconf -e 'smtp_sasl_password_maps = hash:/etc/postfix/sasl_passwd'
    postconf -e 'smtp_sasl_security_options ='
    echo "yourmailserver.com emailusername:emailpassword" > /etc/postfix/sasl_passwd
    Now we will need to change the password file attributes so only root has access to read it.
    chown root:root /etc/postfix/sasl_passwd
    chmod 600 /etc/postfix/sasl_passwd
    postmap /etc/postfix/sasl_passwd
    Now we are going to set the map that will change your outbound messages from nagios to your email server username/email address.
    echo "nagios mailusername@yourmailserver.com" /etc/postfix/canonical
    echo "canonical_maps = hash:/etc/postfix/canonical" >> /etc/postfix/main.cf
    postmap /etc/postfix/canonical
    Now we are going to restart Postfix:
    /etc/init.d/postfix restart
    Now that this all has been completed you can restart your system. 
    Once your system has come back up you will be able to login to the website and look at your first Nagios installation.
    http://yourserver/nagios/
    Now login with the nagiosadmin username and password we created earlier:
    Now here is what you will see once you are logged in.

    Installation Script For Nagios

    Here is the installation script I have created to handle most of the work for installing Nagios. Please note the top of the script, you will need to define some of the variables for the installation to work correctly.
    #!/bin/bash
    #
    # AUTHOR : rbishop
    # DATE : 01.27.2011
    #
    # PROG.-NAME : nagios-setup.sh
    #
    # FUNCTION : Installing Nagios on your System
    #
    #
    #######################################################################
    
    #######################################################################
    ##                                                                   ##
    ##             Configurable Settings for this Script

    [edit]


sumber : http://www.howtoforge.com/nagios-installation-on-ubuntu-10.04-lucid-lynx-p3

Thursday 5 May 2011

INSTALL OPENNMS di Ubuntu 10.04


OpenNMS merupakan salah satu software NMS (network Management System) yang sangat powerful. Berbeda dengan software NMS terdahulu yang lebih menitikberatkan pada network element seperti interface pada switch dan router, OpenNMS lebih menitikberatkan pada service yang ditawarkan oleh network resources, seperti web pages, database access, DNS, DHCP, dll.

Oleh karena itu, pada blog ini saya akan memberikan panduan bagaimana menginstall OpenNMS khusus pada Ubuntu/Ubuntu  10.4 atau versi yang lainnya (Debian Base) berdasarkan pengalaman dan hambatan yang pernah saya alami.

Langkah menginstall OpenNMS :

1. Masuk Sebagai Root
   - sudo su

2. Melakukan Update Terlebih dahulu, Perintah
   - apt-get update

3. Tambahkan OpenNMS Repository
   - nano /etc/apt/sources.list

   Tambahkan perintah di bawah :

  deb http://debian.opennms.org/ stable main
  deb-src http://debian.opennms.org/ stable main


4. 2. Menambahkan OpenNMS PGP Key ke APT
OpenNMS Debian repository ditandai dengan PGP Key. APT harus mengetahuinya 

dengan menggunakan perintah berikut :
wget -O – http://debian.opennms.org/OPENNMS-GPG-KEY | sudo apt-key add -22EE DDA6 8698 B02F B2EC 50B7 062B 8A68 4C4C BBD9


3. Install Sun JDK (saat saya melakukan instalasi yang terbaru adalah java6.Gunakan perintah berikut :
- sudo apt-get install sun-java6-jdk

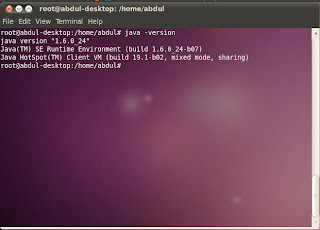
Setelah terinstall, cek versi dari Java :
$ java -version

Jika tidak disebutkan HotSpot, kemungkinan ini bukan merupakan Sun JVM, maka dari itu harus diubah defaultnya, dengan perintah :

( Not recomendations)
$ sudo update-alternatives –config java
$ sudo update-alternatives –config javac
Pilihlah pilihan yang mengarah pada Sun JVM, masukkan dengan mengetikkan 

Pilihan angka yang sesuai.
Tambahkan environment Java di /etc/environment :
JAVA_HOME=”/usr/lib/jvm/java-6-sun”
JDK_HOME=”/usr/lib/jvm/java-6-sun”
Restart /etc/environment dengan menggunakan perintah
. ./etc/environment


4. Install dan Konfigurasi Postgresql
Lakukan instalasi postgresql dengan perintah :

- sudo apt-get install postgresql-8.4 iplike-pgsql84

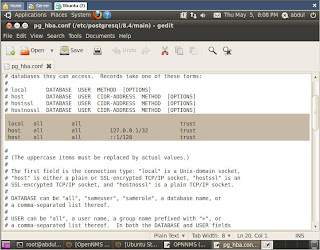
 Buka file konfigurasi di 
- nano /etc/postgresql/8.4/main/pg_hba.conf


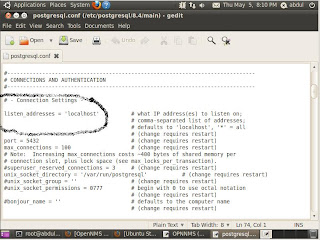
Lalu, buka file konfigurasi yang lainnya di 
- nano /etc/postgresql/8.4/main/postgresql.conf 
dan uncomment baris berikut (buang tanda Kresnya):

listen_addresses = ‘localhost’
Restart postgresql


5. Install install_iplike.sh
- sudo /usr/sbin/install_iplike.sh


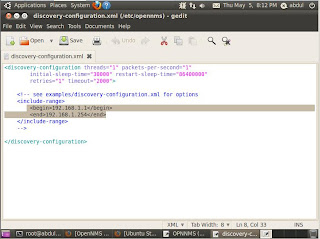
6.  Konfigurasi Discovery Rule
Agar dapat mendeteksi jaringan anda, maka harus diatur terlebih dulu file konfigurasinya pada 
- nano /etc/opennms/discovery-configuration.xml

7. konfigurasi selesai
- sudo /etc/init.d/postgresql-8.2 restart
- sudo /etc/init.d/opennms start


8. 12. Bukalah browser untuk melihat OpenNMS
Bukalah browser internet untuk melihat hasil instalasi anda (IE,firefox, 

opera, dll), lalu masukkan alamat http://192.168.1.101:8980/opennms.

Login dengan menggunakan username dan password : admin


kalo ada yang eror mohon dicoba laagi... ^_^...

Mohon Doanya supaya diberikan kelanjaran untuk ujian ini dan segera meyelesaikan tahun ini... :)..

Semangat... !!!

Teringat pada sebuah pepatah :
Sampai kan lah walau ilmu mu hanya sedikit...

Jangan lupa untuk DIUT ===> Doa, Ikhitar, Usaha dan Tawakal..

Minta doanya ya temen-temen...

Selalu tegur saya jika banyak kekurangan dan keselahan.... ^_^

Ganbatte...