Friday, 27 May 2011

Install dan Konfigurasi SQUID3 di ubuntu server 10.04

Install dan Konfigurasi SQUID3 di ubuntu server 10.04
Install squid3
$ apt-get install squid3

Edit configurasi squid3
nano /etc/squid3/squid3.conf
* catatan : karena banyak scriptnya maka
pencarian bisa menggunakan ctrl+w
- http_port 3128 ---> http_port 8990
- cache_mem 8 Mb ---> enable dengan membuang tanda kresnya
- restart squid

Membuat access control list Acl
Contoh : untuk jaringan 192.168.1.1/24 bisa akses suatu jaringan internet dengan :
Tambahkan script
acl jaringan 192.168.1.1/24
Tambahkan script
http_access allow jaringan
- restart squid

Pasti akan berhasil…


Memblok kata-kata yang dilarang
Tambahkan script
acl blok_kata url_regex -i "/etc/squid3/blok_kata.txt"
Tambahkan
http_access deny blok_kata
Buat file dengan nama blok_domain.txt
Nano /etc/squid3/blok_kata.txt
Memblok Situs
Tambahkan
acl blok-domain dstdomain "/etc/squid/domain_blok.txt"
Tambahkan
http_access deny blok_domain
Buat file dengan nama blok_domain.txt
Nano /etc/squid3/blok_domain.txt

Thursday, 26 May 2011

Rindu Sang Penyayang sepanjang masa

Kalo lagi rindu ma ma ibu... kadang dengerin lagu ini.... ^_^....

Video Courtesy Youtube : http://www.youtube.com/watch?v=RHW-OwoDuDk
Hujan rintik hari ini.. seakan mengingat dan diingatkan...
Kasih sayangmu sepanjang...
InsyaAllah.. akan memenuhi permintaan mu ibu... ^_^..


Dan selalu terngiang..
" Dek... kalo raga  ini jauh, yakinlah bahwa kita akan selalu dekat".
Jaga ibadah mu dek , Dan sebelum tidur jangan lupa untuk selalu sempatkan untuk mengaji...
Status yang ada di wall salah satu temen....


pengen nulis puisi buat ibu....
Tapi sayang bukan seorang romantisan... walau kadang pernah dapat hadiah dari puisi GJ 2-1 tahun yang lalu.. hehehe...

Saturday, 14 May 2011

sabarlah wahai hati

 Semangat dipagi weekend.. berharap lebih baik lagi daripada hari kemarin.
Semangatlah wahai sahabat...!!!
Kesempurnaan hanya milik Allah semata, namun manusia harus tetap berusaha


mohon untuk mendoakan agar kita semangat... ^_^

Wallahualam...

Thursday, 5 May 2011

INSTALL OPENNMS di Ubuntu 10.04


OpenNMS merupakan salah satu software NMS (network Management System) yang sangat powerful. Berbeda dengan software NMS terdahulu yang lebih menitikberatkan pada network element seperti interface pada switch dan router, OpenNMS lebih menitikberatkan pada service yang ditawarkan oleh network resources, seperti web pages, database access, DNS, DHCP, dll.

Oleh karena itu, pada blog ini saya akan memberikan panduan bagaimana menginstall OpenNMS khusus pada Ubuntu/Ubuntu  10.4 atau versi yang lainnya (Debian Base) berdasarkan pengalaman dan hambatan yang pernah saya alami.

Langkah menginstall OpenNMS :

1. Masuk Sebagai Root
   - sudo su

2. Melakukan Update Terlebih dahulu, Perintah
   - apt-get update

3. Tambahkan OpenNMS Repository
   - nano /etc/apt/sources.list

   Tambahkan perintah di bawah :

  deb http://debian.opennms.org/ stable main
  deb-src http://debian.opennms.org/ stable main


4. 2. Menambahkan OpenNMS PGP Key ke APT
OpenNMS Debian repository ditandai dengan PGP Key. APT harus mengetahuinya 

dengan menggunakan perintah berikut :
wget -O – http://debian.opennms.org/OPENNMS-GPG-KEY | sudo apt-key add -22EE DDA6 8698 B02F B2EC 50B7 062B 8A68 4C4C BBD9


3. Install Sun JDK (saat saya melakukan instalasi yang terbaru adalah java6.Gunakan perintah berikut :
- sudo apt-get install sun-java6-jdk

Setelah terinstall, cek versi dari Java :
$ java -version
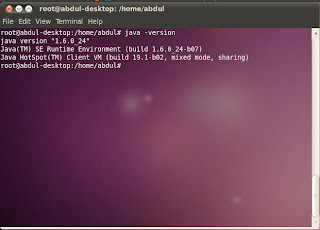
Jika tidak disebutkan HotSpot, kemungkinan ini bukan merupakan Sun JVM, maka dari itu harus diubah defaultnya, dengan perintah :

( Not recomendations)
$ sudo update-alternatives –config java
$ sudo update-alternatives –config javac
Pilihlah pilihan yang mengarah pada Sun JVM, masukkan dengan mengetikkan 

Pilihan angka yang sesuai.
Tambahkan environment Java di /etc/environment :
JAVA_HOME=”/usr/lib/jvm/java-6-sun”
JDK_HOME=”/usr/lib/jvm/java-6-sun”
Restart /etc/environment dengan menggunakan perintah
. ./etc/environment


4. Install dan Konfigurasi Postgresql
Lakukan instalasi postgresql dengan perintah :

- sudo apt-get install postgresql-8.4 iplike-pgsql84

 Buka file konfigurasi di 
- nano /etc/postgresql/8.4/main/pg_hba.conf
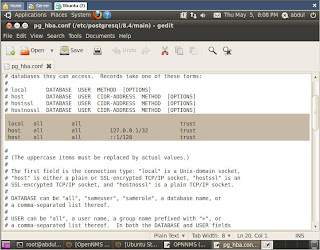

Lalu, buka file konfigurasi yang lainnya di 
- nano /etc/postgresql/8.4/main/postgresql.conf 
dan uncomment baris berikut (buang tanda Kresnya):

listen_addresses = ‘localhost’
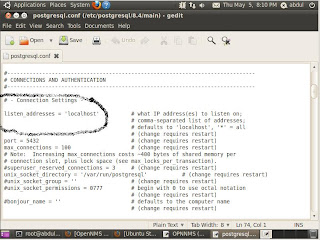
Restart postgresql


5. Install install_iplike.sh
- sudo /usr/sbin/install_iplike.sh


6.  Konfigurasi Discovery Rule
Agar dapat mendeteksi jaringan anda, maka harus diatur terlebih dulu file konfigurasinya pada 
- nano /etc/opennms/discovery-configuration.xml
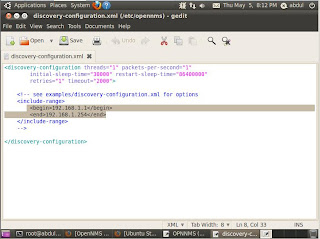
7. konfigurasi selesai
- sudo /etc/init.d/postgresql-8.2 restart
- sudo /etc/init.d/opennms start


8. 12. Bukalah browser untuk melihat OpenNMS
Bukalah browser internet untuk melihat hasil instalasi anda (IE,firefox, 

opera, dll), lalu masukkan alamat http://192.168.1.101:8980/opennms.

Login dengan menggunakan username dan password : admin


kalo ada yang eror mohon dicoba laagi... ^_^...

Mohon Doanya supaya diberikan kelanjaran untuk ujian ini dan segera meyelesaikan tahun ini... :)..

Semangat... !!!

Teringat pada sebuah pepatah :
Sampai kan lah walau ilmu mu hanya sedikit...

Jangan lupa untuk DIUT ===> Doa, Ikhitar, Usaha dan Tawakal..

Minta doanya ya temen-temen...

Selalu tegur saya jika banyak kekurangan dan keselahan.... ^_^

Ganbatte...

Saturday, 30 April 2011

Cerita

Menulis
Sekedar iseng saja.. lagi pengen nulis...
Dulu seperti ini...
kemaren adalah history
Sekarang adalah Reality
Besok adalah Mistery...

Foto Perbaikan Tower..


Foto STO Plered


Masih banyak kegiatan lain :
STO Karawang
Gedung DPRD Purwakarta
Masjid Dekat Rel Kereta
Makan Bakso
Munggahan Ramadhan
Situ Buled
Curug
Kosan mbah gandrong... hehe ^-^
Kantor Direktur....
STO PWK
SISKA
STO Cikampek
Makan Warteg
Jalan-jalan ke sekolah


Mungkin ada tambahan dari yang lain.. ^-^

Sunday, 17 April 2011

Install dan konfigurasi DNS, BIND9

Install terlebih dahulu paket DNS
- apt-get install bind9

kemudian ikuti langkah berikut

1. gedit /etc/network/interfaces


auto lo
iface lo inet loopback

auto eth0
iface eth0 inet static
address 192.168.1.100
netmask 255.255.255.0
gateway 192.168.1.1


2. gedit /etc/bind/named.conf.local


//
// Do any local configuration here
//

// Consider adding the 1918 zones here, if they are not used in your
// organization
//include "/etc/bind/zones.rfc1918";


zone "abdul.com"
{

type master;
file "/etc/bind/db.abdul.com";
};

zone "1.168.192.in-addr.arpa"
{
type master;
file "/etc/bind/db.192";
};


3. gedit /etc/bind/named.conf.options


options {
directory "/var/cache/bind";

// If there is a firewall between you and nameservers you want
// to talk to, you may need to fix the firewall to allow multiple
// ports to talk.  See http://www.kb.cert.org/vuls/id/800113

// If your ISP provided one or more IP addresses for stable
// nameservers, you probably want to use them as forwarders.
// Uncomment the following block, and insert the addresses replacing
// the all-0's placeholder.

forwarders {
192.168.1.100;
};

auth-nxdomain no;    # conform to RFC1035
listen-on-v6 { any; };
};


4. cp /etc/bind/db.local  /etc/bind/db.abdul.com

5. cp /etc/bind/db.127   /etc/bind/db.192

6. gedit /etc/bind/db.abdul.com


;
; BIND data file for local loopback interface
;
$TTL 604800
@ IN SOA abdul.com. root.abdul.com. (
     2 ; Serial
604800 ; Refresh
 86400 ; Retry
2419200 ; Expire
604800 ) ; Negative Cache TTL
;
@ IN NS abdul.com.
IN A 192.168.1.100
www IN A 192.168.1.100
ftp IN CNAME abdul.com.
mail IN A 192.168.1.100


7. gedit /etc/bind/db.192

;
; BIND reverse data file for local loopback interface
;
$TTL 604800
@ IN SOA abdul.com. root.abdul.com. (
     1 ; Serial
604800 ; Refresh
 86400 ; Retry
2419200 ; Expire
604800 ) ; Negative Cache TTL
;
IN NS abdul.com.
100 IN A abdul.com.
100 IN PTR abdul.com.
100 IN PTR mail.abdul.com.


8. gedit /etc/hosts


127.0.0.1 localhost
192.168.1.100 abdul.com abdul

# The following lines are desirable for IPv6 capable hosts
::1     localhost ip6-localhost ip6-loopback
fe00::0 ip6-localnet
ff00::0 ip6-mcastprefix
ff02::1 ip6-allnodes
ff02::2 ip6-allrouters
ff02::3 ip6-allhosts


9. gedit /etc/resolv.conf

# Generated by NetworkManager
nameserver 192.168.1.100
domain abdul.com
search abdul.com

10. restart dns system nya...

ok.. selamat mencoba..

Menambahkan Modul bahasa Indonesia Ecommerce 2.2 RC.2

Menambahkan Modul bahasa Indonesia Ecommerce 2.2 RC.2
1.      Estrak terlebih dahulu file bahasa Indonesia.rar
2.      Kemudian coppy dan paste file yang  telah di estrak.
Dalam file estrak : catalog/include/languange

3.      Kemudian file folder Indonesia dan Indonesia.php yang di atas di copy ke htdocs /toko/include/language


4.      Kemudian buka browser dan masuk ke halaman admin kemudian pilih Localizationàlanguage


5.      Kemudian klik “ New Language”


Nama               : indonesia
Code                : id
Images             : icon.gif
Directory         : Indonesia      
Sort order         : 1

Kemudian klik insert

 6.      Maka akan tampilan sebagai berikut


7.      Kemudian refresh websitenya dan pilih language Indonesia


Jika tampil yang seperti ini…
Harap untuk membersihkan di halaman admin ..
Toolsàdefinie languageà kemudian cari index.php lalu delete file yang text seperti tutorial yang dulu
8.      Setelah di refresh lagi kemudian website akan kembali seperti ini
file dapat di download di http://downloadfile.site90.net/

Saturday, 16 April 2011

Memperbaiki Oscommerce part 2 ( Install)

Memperbaiki Oscommerce part 2

Langsung untuk berikut caranya :
1.      Masuk ke halaman admin pada web browsernya ..
Masukan username dan passowrdnya.


2.      Kemudian pilih toolsàdefine language cari file index.php


3.      Jika sudah ketemu klik file index.php


4.      Kemudian hapus bagian yang seperti ini..


This is a default setup of osCommerce Online Merchant. Products shown are for demonstrational purposes. Any products purchased will not be delivered nor will the customer be billed. Any information seen on these products is to be treated as fictional.
' . tep_image(DIR_WS_IMAGES . 'default/1.gif') . 'Error Messages

If there are any error or warning messages shown above, please correct them first before proceeding.

Error messages are displayed at the very top of the page with a complete background color.

Several checks are performed to ensure a healthy setup of your online store - these checks can be disabled by editing the appropriate parameters at the bottom of the includes/application_top.php file.
' . tep_image(DIR_WS_IMAGES . 'default/2.gif') . 'Editing Page Texts

The text shown here can be modified in the following file, on each language basis:

[path to catalog]/includes/languages/' . $language . '/' . FILENAME_DEFAULT . '

That file can be edited manually, or via the Administration Tool with the Languages->' . ucfirst($language) . '->Define or Tools->File Manager modules.

The text is set in the following manner:

define(\'TEXT_MAIN\', \'This is a default setup of the osCommerce project...\');

The text highlighted in green may be modified - it is important to keep the define() of the TEXT_MAIN keyword. To remove the text for TEXT_MAIN completely, the following example is used where only two single quote characters exist:

define(\'TEXT_MAIN\', \'\');

More information concerning the PHP define() function can be read here.
' . tep_image(DIR_WS_IMAGES . 'default/3.gif') . 'Online Documentation

Online documentation can be read at the osCommerce Knowledge Base site.

Support is available at the osCommerce Support Site.

If you wish to download the solution powering this shop, or if you wish to contribute to the osCommerce project, please visit the support site of osCommerce. This shop is running on ' . PROJECT_VERSION . '.');

define('TABLE_HEADING_NEW_PRODUCTS', 'New Products For %s');
define('TABLE_HEADING_UPCOMING_PRODUCTS', 'Upcoming Products');
define('TABLE_HEADING_DATE_EXPECTED', 'Date Expected.

5.      Kemudian nantinya file index.php akan seperti ini :


6.      Kemudian refresh website nya.


Memperbaiki Oscommerce Setelah di Install ( Error Warning)


Berikut langkah langkah nya :
1.      Ada tanda meraha yang diatas merupakan warning yang harus kita perbaiki.
a.      Warning Warning: Installation directory exists at: C:/xampp/htdocs/tokoku/catalog/install. Please remove this directory for security reasons.
b.      Warning Warning: I am able to write to the configuration file: C:/xampp/htdocs/tokoku/catalog/includes/configure.php. This is a potential security risk - please set the right user permissions on this file.
2.      Cara memperbaiki “ Warning Warning: Installation directory exists at: C:/xampp/htdocs/tokoku/catalog/install. Please remove this directory for security reasons.”
Adalah dengan meremove folder install yang ada di C:/xampp/htdocs/tokoku/catalog/


 3.      Untuk mehilangkan “Warning Warning: I am able to write to the configuration file: C:/xampp/htdocs/tokoku/catalog/includes/configure.php. This is a potential security risk - please set the right user permissions on this file.”
Adalah denga memcari file configure.php yang terletak di C:/xampp/htdocs/tokoku/catalog/includes/ : kemudian klik kananàpropertiesàCentang readonlyàok


4.      Kemudian refresh website toko online nya.. maka tidak ada warning lagi